You worked a lot to create great content. You posted it on your blog, on your social media accounts, and ensured it's optimized for search engines.
But the views and subscribers aren't where you'd like them to be.
If it's any consolation, know that getting traffic is actually a common problem for most marketers. And while there are many ways to get those numbers up, content syndication stands out because it's really cost-effective, helps you boost brand awareness, and improves SEO performance.
That's if you do it right, of course. Otherwise, you risk being outranked by other publications with your own content. Additionally, you could end up negatively impacting your SEO performance by picking the wrong website to syndicate on.
At this point, you might be wondering -- what's the best way to use this tactic, and how can I avoid the drawbacks?
In this blog post, I'll show you content syndication best practices you need to be aware of to make this tactic work for your business.
But first, let's talk about what content syndication really is (and what it's not).
It's important to note that, although it might seem similar, content syndication is not the same as guest blogging. A guest post is a completely new piece of content, written specifically for one publication. Syndicated content is literally taking the same piece of content and republishing it, with permission, on other platforms.
From the reader's perspective, one can tell if an article was syndicated, and not a guest post, because there's usually a mention on the page about the original source. Typically, publications mark syndicated piece with text like this:
"This article originally appeared in [Original publication + Link]."
OR
"This article appeared in [Original publication + Link] and has been published here with permission."
This is a very important mention, not only for giving credit to the original author but also to avoid duplicate content issues.
Content Syndication and SEO
As you probably know, Google doesn't like duplicate content.
It won't penalize a website directly for duplicate content, but it might not help with their SEO performance, either.
The good news is that syndicated content isn't the same as duplicate content. Even Google says it's OK to syndicate content, as long as you do it carefully and make it obvious for search engines and readers that what they see is a syndicated piece. You can do that by including a link back to the original article and, ideally, getting the third-party publication to include a canonical link.
Read more: Canonicalization 101: Everything You Need to Know About Canonical URLs
How you add the canonical link typically depends on the publication. If the process is not clear, it's something worth discussing with the editor from the very beginning.
Additionally, let's not forget about the references (links) included within the content. Again, each publication has its own guidelines about references, so it's good to discuss this with the editor before starting a partnership. But if you can reference your own content, a syndicated article can be a driver of referral traffic and a way to improve your rankings and organic traffic performance.
Scott Mathson, Senior Web Strategy and SEO Manager at Auth0, says that "if you include internal links, content that you syndicate across platforms often passes authority and equity through to these links. Signals from an increase in traffic from new and different referral channels, alongside a broadened backlink profile (whether nofollow or follow), and other factors gives search engines further context around your content and its relevancy and popularity."
Scott has seen how content syndication can impact a website's SEO performance (directly and indirectly). Over the past two years, he's used content syndication (among other tactics) to grow the website's backlink profile from 200K to over 4.4 million backlinks.
Now that we have the basics covered, here's how to do content syndication successfully.
There are two ways to go about content syndication -- free, or paid. The free way means you focus on finding the right publications, pitching your content, and building partnerships, one at a time. The paid solution means using tools that allow you to get your content recommended in major publications more quickly.
Here's everything you need to know about both free and paid content syndications methods.
Free Content Syndication
There are four main ways in which you can syndicate your content for free:
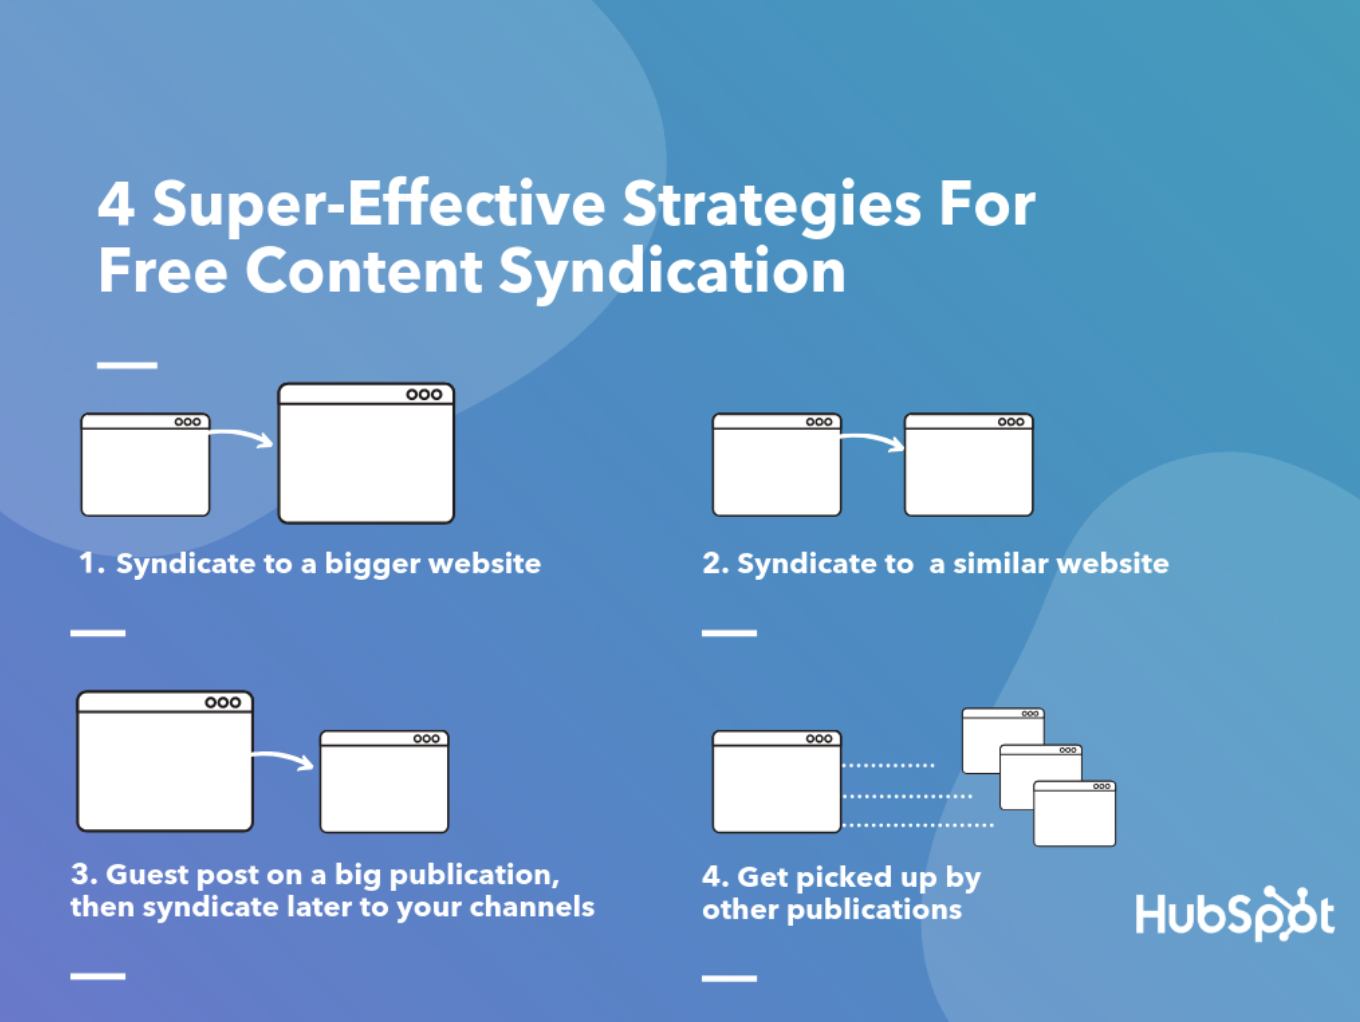
Republish your latest or best-performing content on bigger websites, with more readers and higher authority than yours. When you syndicate to a bigger publication, you amplify your reach. However, since readers can consume the entire piece of content directly on the third-party website, there's little incentive for them to check out the original source. So only a small percentage of the readers will visit your website. That said, if your main goal is to increase your brand awareness, then syndicating on major publications is the way to go. Syndicate old content on websites that have roughly the same audience and authority as yours. If you want to focus more on a niche audience, then you should consider syndicating content to smaller, more focused publications. Ideally, look for publications with similar authority and readership as your blog. They might also allow more contextual links so you can reference back to your blog from the article. It's a great way to let their readers discover more content on your blog and generate new leads. Guest post on a bigger publication and syndicate later on your website, Medium, or LinkedIn. Sometimes it's worth publishing on a big site first, as they might only be interested in fresh, original content. You get the benefit of getting your thought leadership in front of a big audience that otherwise wouldn't have reached your content. After a while, depending on the publication, you're free to republish that piece to your audience and social channels. Basically, you get more bang for your content buck. Get picked up by websites that naturally syndicate content. If you take the title of a recent article from a big publication and type it into Google, you'll see it's been picked up by many small publications. These usually publish an excerpt from the original piece and link back to the source.
Here's an example:

To make your blog more visible, try first creating a page where you explain how people can syndicate your content. This "steal our content … please" page from UniverseToday.com is a good example of how to go about it.
Then, make sure you optimize your website for syndication.
Scott Mathson told me, "Syndication often relies on feeds and sitemaps, so take the time to focus on optimizing your website's posts feeds, sitemaps, and other XML files to ensure it is valid and in line with guidelines for various publishing platforms. Once optimized, setup the connections for automating syndication, whether through setting up connections to sitemaps and feeds or through developing API connections to various syndication sites. Setting up this automation for cross-posting your content to sites like Flipboard saves time in the long run."
Lastly, give other publication a reason to syndicate your content either entirely or partially. For example, include charts, infographics, or diagrams that can easily be picked up and syndicated.
"Presenting key statistics, tips and takeaways from your content in a visual format, like an infographic or slidedeck, can make your content more attention-grabbing. Even if sites don't want to syndicate an entire article, they may still be open to sharing your visual content, since it can complement their existing piece and help boost the engagement on their page," said Sara McGuire, Content Lead at Venngage, where they used visual content to grow their site traffic by 400%.
In this next section, you'll learn how to find publications where your competitors' syndicate content, which ones to choose, and which to avoid.
How to Find Content Syndication Partners
There are numerous tools you can use, including BuzzSumo, Ahrefs, SEMRush -- just to name a few. You can check any website's latest backlinks for content syndication opportunities.
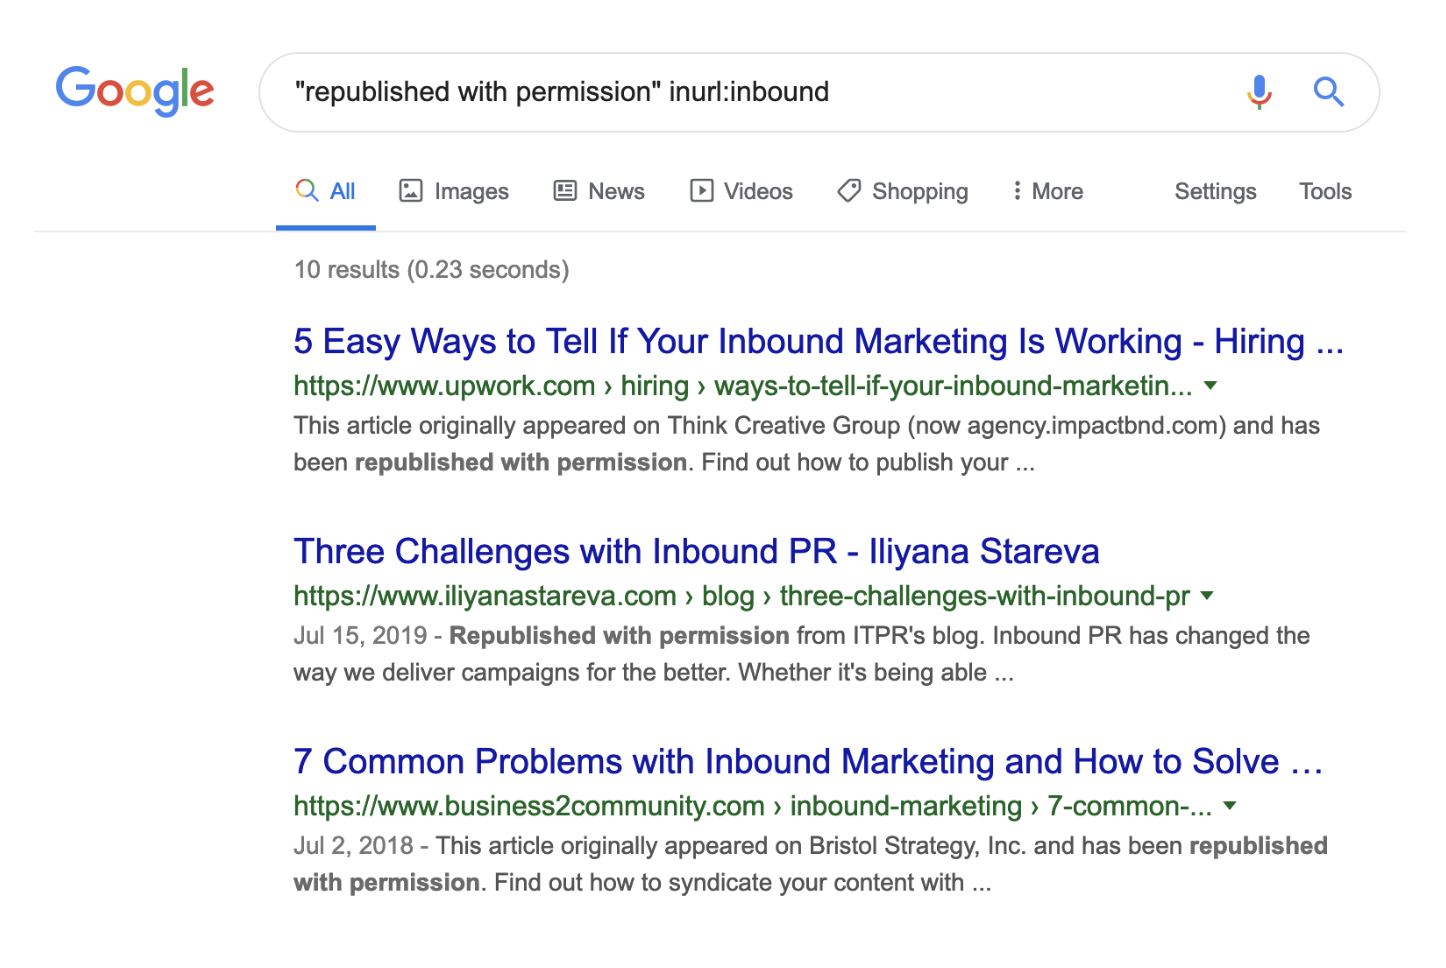
Most likely, the easiest place to start is a Google search. Look for articles that mention:
"originally published in"
"republished with permission"
"originally appeared on"
To narrow your search to publications in your niche, add inurl:[domain] to your search. Here's a real-life example of inbound blogs that syndicate content:
When selecting publications, look for the ones that have:
similar or better authority than your blog a readership that's similar to your buyer persona canonical links to original articles
There are also publications you need to stay away from. Publishing there might ultimately harm your brand and SEO performance. Make sure you avoid publications with:
low authority spammy outbound links no clear editorial guidelines
To help you get started, I've put together a list of websites where you can syndicate content right away.
Paid Content Syndication
Paid content syndication is, well, when you pay to be published.
The most common form of paid syndication has been around for a while. Big brands often collaborate directly with big publishers and get their content in front of a big audience. This tactic, however, wasn't available for smaller brands with a more limited budget.
Fortunately, there are now tools like Outbrain and Taboola which make it possible for even smaller brands to appear as recommended content on sites like CNN, BBC, or The Guardian.
You've probably seen these ads before:
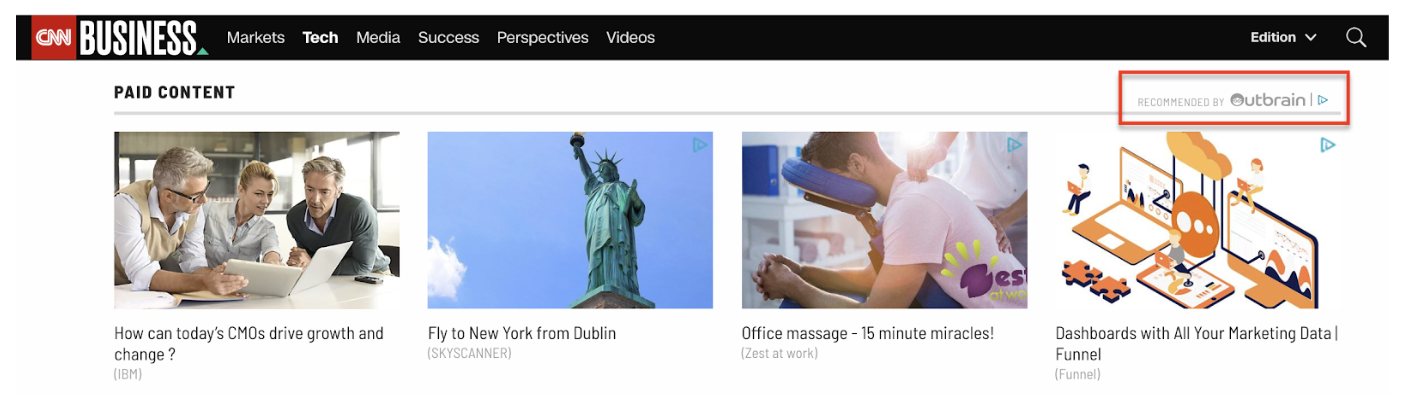 The way these platforms work is pretty much like any PPC campaign. You can set a capped budget, a cost-per-click, and a target audience. Then the platform serves readers with your ad as a recommended article, featuring an image, a short title, and a link back to your website.
It's probably worth mentioning here that these links don't carry any SEO authority. They are seen as "sponsored content" by search engines, and sometimes by readers, too.
Every time a reader clicks on one of these ads, you are charged a cost that varies depending on the target audience and other campaign settings.
That said, paid syndication is a much more straightforward option to get your content featured in major publications. It's probably also the only way to get your content on sites like CNN. However, paid doesn't give you the same SEO and even brand awareness benefits as free syndication.
Ultimately, content syndication is a fantastic opportunity to reach a new audience and potentially convert those readers into leads. Additionally, if you syndicate other publication's content on your own site, you're able to serve your readers fresh, valuable content without requiring them to leave your site to find it elsewhere.
![]()
Read more: blog.hubspot.com
In September 2018, I was just a few months into my journey of learning web development. As I'm sure is the case with many new developers, it was a big task for me to learn not only the basic skills required, but also keeping current with the fast-moving industry. Just as I was getting to the level where it felt as though I could build a simple website, I started to realize that it was only the first step.
Opening up a few HTML pages stored locally on my laptop felt like a million miles away from being able to say to someone, "Hey, check out my website, live on the actual internet!"
But I did it! And the best part is that it wasn't as scary, difficult or expensive as it first felt like it'd be.
It all started with me sending Chris an email, which he used to write an awesome article explaining everything in plain English.
At this point, I didn't have a fully coded website — just an idea for a basic site that I was using to teach myself as I went along. I used the ongoing progress of my site as a push to learn how to get a live website quicker. But I'm sure you could do the whole thing with an HTML document that just says "Hello, world!"
I built my site using Gatsby, a static site generator powered by React. Building a website with these tools in a modular way felt really natural to me. The concept of reusable parts is something I’m familiar with in my career as a physical product designer and mechanical design engineer. It means that you can build in stages, like Lego, brick-by-brick, until you eventually have a life-sized castle you can invite your friends to visit!
This isn't a guide. It's my personal experience in the process of getting a website from my laptop to being live on the internet. Hopefully it'll give you some hope that it's possible and achievable, even by someone who has no formal training in web development and who has only been doing it for 12 months!
Domain registrars
Before I ever bought a domain, it seemed like a pretty serious thing to do. Owning a domain means being responsible for it. People will go to that address and eventually see content that you've put there.
I don’t know if everyone has the same experience, but I spent weeks deciding on a domain name before going for it. It almost became an obsession of mine for a while, searching online for acronym generators to try and be clever, spending hours on dictionary.com trying to find synonyms that were cool. In the end, I settled for my name and what I do: joshlong.design. I still smile a little when I see my name in the address bar.
Since reading Chris' article, I've actually bought two domains from two different providers: a .com and a .design. I realize that I went against Chris' advice of consolidating domain names at a single registrar, but I needed to shop around a bit to get a good deal on my .design domain. I only own two domain names — and one of them I don't actually have any plans for just yet — so keeping on top of where I bought them isn't a task. In fact, I don't remember the last time I needed to login and manage the domain I use on a daily basis!
Buying a domain name was as simple as any other online shopping transaction. Nothing really huge or scary about it. I bought my .com through Namecheap, and my .design through Google Domains, and the process was pretty similar for both. All they needed was my name, address and payment details. Pretty standard stuff!
I don't remember Google trying to sell me a load of extra packages. They seemed happy with me just buying a domain, though they did offer me free WHOIS protection which I snapped up because I didn’t want my contact details freely available for anyone who’s feeling nosey. However, as Chris warned might happen, the other registrar I went through tried really hard to sell me some extras like hosting, email, a VPN (whatever that is!) and SSL certificates.
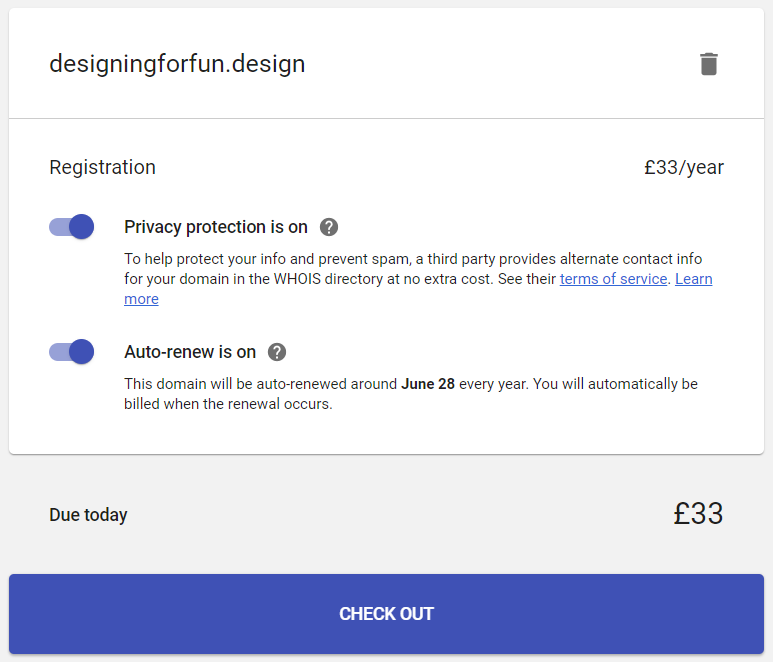 Google Domains checkout is happy just to sell the domain name.
 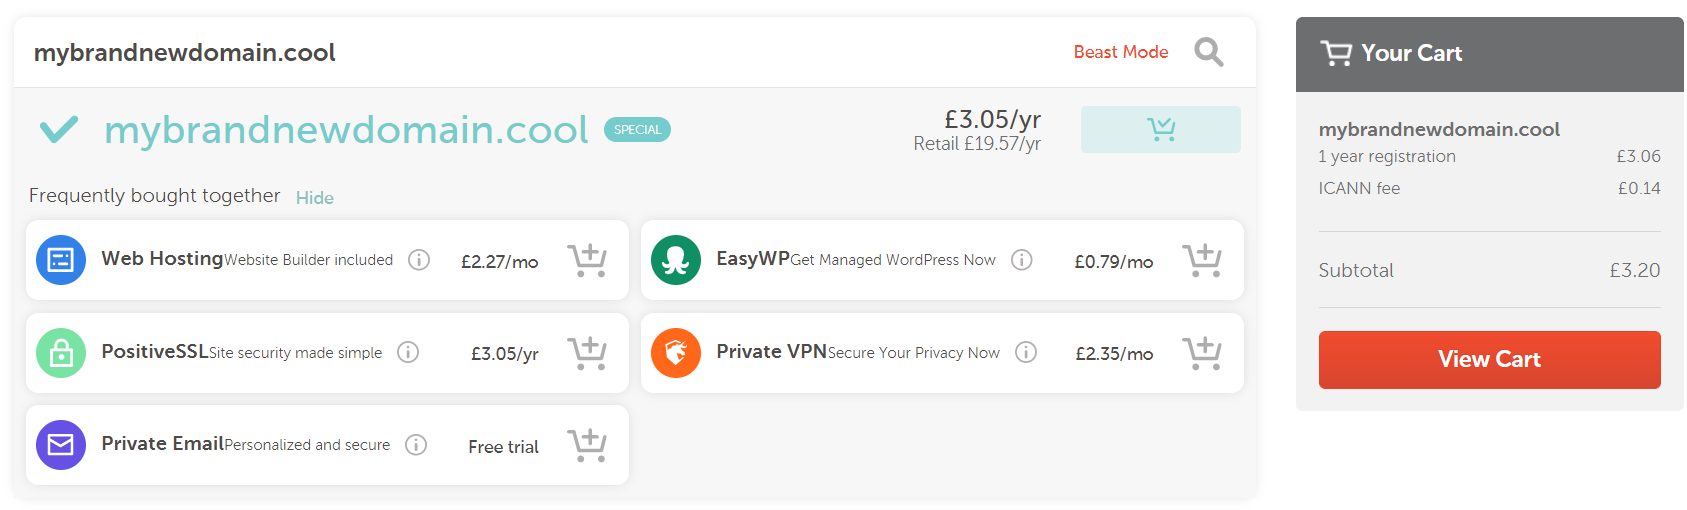 Namecheap tries to sell you all the additional services they offer before getting to the checkout.
I didn't go for any of those extras. I already had a hosting plan, and you can use an alias through Gmail to "fake" having a me@mycoolsite.com email address. I honestly have no idea why I'd need a VPN, and the hosting I was going to go for gave me a free SSL certificate through Let's Encrypt. So just the domain name, please!
Hosting
As Chris suggested it would be, choosing a host was a tad trickier than choosing and buying a domain name. But in the end, the web technology I used to build my site kind of guided me in a particular direction.
My site is built with Gatsby, which means it outputs straight-up static assets, basically as HTML and JavaScript files. That means that I didn't need a host that offered a server (in my most super smart authoritative voice), especially for WordPress with a MySQL database and Apache server, 6 cores @ 3.6 Ghz, 4GB RAM, 5TB bandwidth, 5 IP Addresses and 500GB SSD Storage, etc.
All that jargon goes straight over my head. All I wanted to do was upload my files to the internet and go to my domain to see them all compiled and shiny. Should be easy, right?
Well it turns out that it actually was that easy. As there's been so much hype around it recently, I thought I'd take a look at Netlify.
Netlify is recommended by Gatsby. They have really good documentation, and for my uses I felt as though I could comfortably stay within the free tier that they offer. In fact, at the moment I'm using 0.08% a month of the total bandwidth the free tier offers. Winning! Although maybe that means I’m not doing enough to get people to my site...
A quick aside about GitHub: I'm no expert at it and I don't really know any of the etiquette it entails. All I did was sign up, create a new repository and follow the instructions that they give you. After that, every time I made a change to my site, I used the buttons in my code editor (VS Code) to commit and push my changes. It works, but I have no idea if it's the correct or best practice way of doing it! I'm starting now, though, to understand how to use Git through the command line. I had no idea at all how to do it when I started, but I still muddled through it — and you can too!
Back to Netlify.
I signed up for an account (no credit card details required) and added a new site to Netlify by telling it about the GitHub repository where it was stored. When you’ve connected your repository, you can watch Netlify doing its thing deploying your site.
 Part of the Netlify’s deploy process is that it shows your website going live in real time. That’s useful for debugging if something goes wrong, or just to watch and get excited like an impatient puppy waiting for a biscuit.
 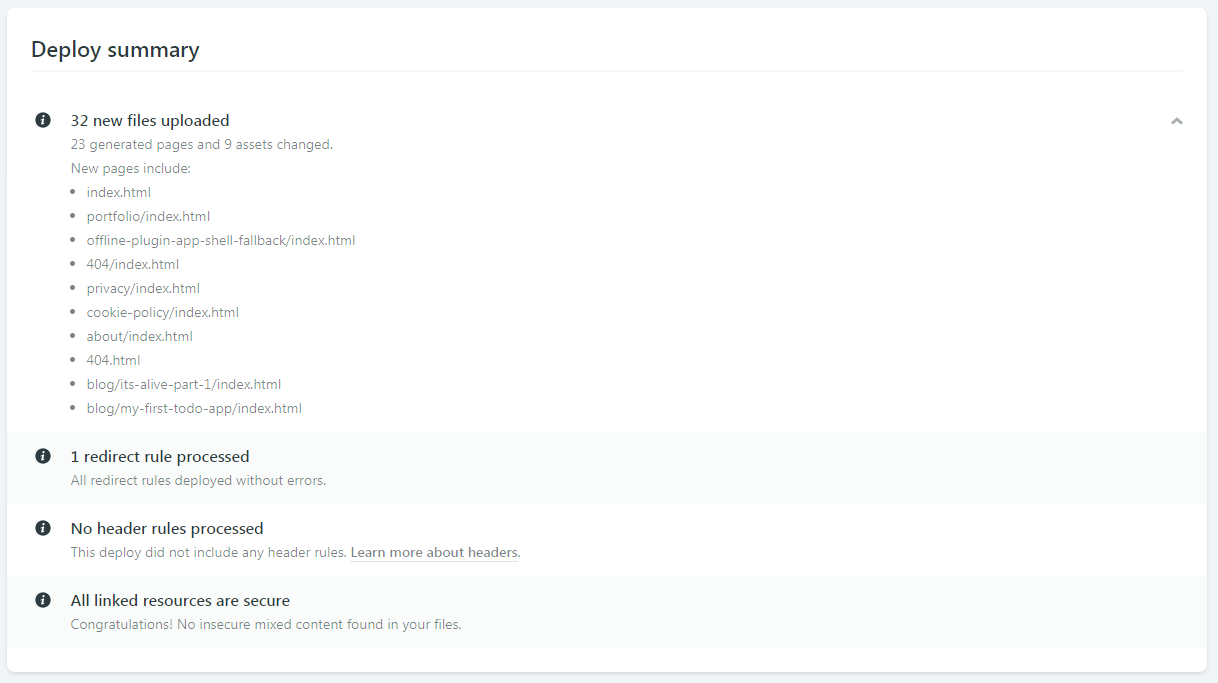 You also get a deploy summary to quickly see what files were uploaded during deployment.
After my site was deployed to the randomly generated URL Netlify gives you, I followed their instructions for adding a domain I had registered elsewhere. They make it so easy!
I assume the instructions will be different for different hosts, but basically, Netlify gave me some server addresses which I then had to go back to my domain registrar to enter them in. These addresses are referred to as nameservers, so look out for that word!
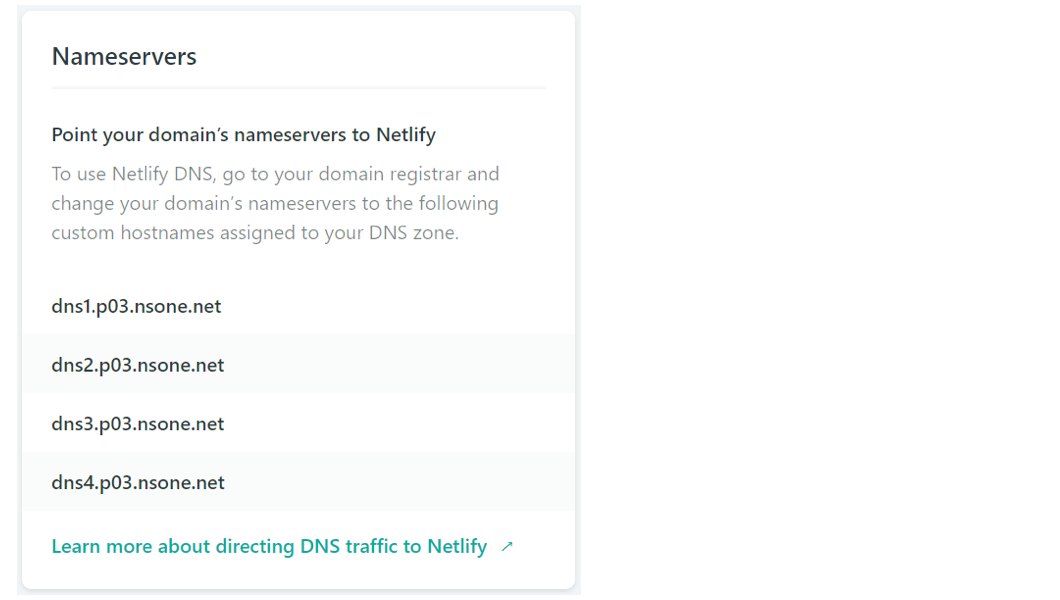 Netlify gives you your nameserver addresses and super easy to understand documentation to set them up with your domain registrar
Once I entered my Netlify nameservers into Google Domains, Google knew where to look to send people who type my domain name into their browser’s address bar. All I had to do after that was wait for some internet magics to happen in the background. That took around three hours for me but can take anywhere from 10 minutes to 24 hours from what I hear.
After that was done, I could type my shiny new domain name into the address bar and — just like that — I'm looking at my own site, hosted live on the internet!
Content Management Systems
The world of Content Management Systems (CMS) is vast, and confusing, but it can also be completely irrelevant to you if you want it to be. I felt so liberated when I realized you don't have to worry about it. It was one less thing in my list of things to do.
My Gatsby site posts and pages (my content) was just a directory of markdown files and my CMS was my text editor. Chris and Dave talked about the idea of this in a recent episode of ShopTalk Show.
 My website content is managed right in my text editor, VS Code.
Because I wanted to have a standard structure for different types of posts and pages, I eventually started using NetlifyCMS which is an open-source CMS which can be included in your site real fast. (Chris also did a video recently about NetlifyCMS for his confer-reference site... see what I did there?!) Now I can create blog posts and drafts from anywhere in the world, straight from my website, as long as I have an internet connection!
 The same content managed through NetlifyCMS, which offers a great UI and GitHub integration Asset Hosting (CDNs)
A Content Delivery Network (CDN), as Chris explained in his article, is basically somewhere on the internet where you store the files you need for your website to run, HTML, CSS, images, etc. When your website needs them, it goes to the CDN and grabs the files for your site to use.
From what I've read, it's good practice to use a CDN, and because of the hosting decision I made, it's not something I have to worry about - it's included by Netlify as standard, for free!
Netlify has it's own CDN where all of the files for your website are stored. When someone goes to your website, Netlify goes to its CDN and grabs the files. It's amazingly quick, and makes your site feel so much smoother to navigate.
It's a long journey, but you can do it!
There was a point, before I set off on the journey of getting my website live, where I tried to convince myself that it's fine to just have local websites, as my career isn’t in web development. The reason for that was because the path felt like it would be difficult, long and expensive.
In fact, it was none of those things! You could get a website live on the internet for £0.99 (~$1.25 for you Americans) or less if you find a deal on a domain name. The domain name was my only expense because for the path I took for hosting, asset management and content management.
At a super basic level, the path looks like this..
Code > Buy Domain > Find/Buy Hosting > Update Nameservers > Upload Code > Live!
If you happen to use the same vendor to buy your domain name and your hosting, you can skip the nameserver step. (Netlify sells domains too!)
It's definitely possible for anyone to get their website live on the internet. There's a process that you need to follow, but if you take your time, it can be relatively straightforward. It's a really wonderful feeling, getting a thing you built in front of people, and it's honestly something that I thought I'd never be able to do. But it's certainly within everyone's reach!
Something I've come to really admire over this process (and thousands of Google searches) is the willingness of everyone in the web community to collaborate and help, accepting me and my questions as I tried to learn what I was doing. It's something that I wish was more common in my own industry.
I'd love to hear other people's experiences getting their first website live. What were your pitfalls and triumphs? Was it as scary as it first seemed?
The post A Beginner’s Journey to Launching a Website appeared first on CSS-Tricks.
Read more: css-tricks.com